#netcat tcp scanner java
Explore tagged Tumblr posts
Visit Tumblr Blog
Explore Tumblr blogs with no restrictions, modern design and the best experience.
Last Seen Tumblr Blogs


Fun Fact
The most popular pages on Tumblr are about Minecraft, GIFs, and David J. Peterson.
Link
If you're a penetration tester, there are numerous tools you can use to help you accomplish your goals.
From scanning to post-exploitation, here are ten tools you must know if you are into cybersecurity.
What is Cybersecurity?
Being a cybersecurity engineer means being responsible for an entire network. This network includes computers, routers, mobile phones, and everything that connects to the internet.
Thanks to the rise of Internet of Things, we see more and more devices connecting to the internet every day. Services like Shodan are proof of how dangerous it is to have an internet-connected device without adequate security.
We cannot rely on Antivirus software either, given how sophisticated today’s hackers are. Besides, most attacks nowadays use social engineering as their entry point. This makes it even harder for cybersecurity professionals to detect and mitigate these attacks.
Covid-19 has become another major catalyst for growing cyber-attacks. Employees working from home don’t have access to the same enterprise-level security architectures in their workplace.
The growing number of cyber-attacks have also increased the demand for cybersecurity professionals around the world. Due to this increasing demand, Cybersecurity has been attracting a lot of experts as well as beginners.
For those of you who are new to Cybersecurity, hacking is not as cool as it looks on TV. And there is a high probability that you will end up in jail.
However, being a penetration tester or a white hat hacker is different – and beneficial – since you will be playing with the same tools black hat hackers (the bad ones) play with. Except for this time, it's legal, and your goal is to help companies discover security vulnerabilities so they can fix them.
You can learn more about the types of hackers here.
It is always hard to find the right tools to get started in any domain, especially if you are a beginner. So here are 10 tools to help you get started as a cybersecurity engineer.
Top Tools for Beginner Cybersecurity Engineers
Wireshark

Having a solid foundation in Networking is essential to becoming a good penetration tester. After all, the internet is a bunch of complex networks that communicate with each other. If you are new to Networking, I recommend this playlist by Network Direction.
Wireshark is the world’s best network analyzer tool. It is an open-source software that enables you to inspect real-time data on a live network.
Wireshark can dissect packets of data into frames and segments giving you detailed information about the bits and bytes in a packet.
Wireshark supports all major network protocols and media types. Wireshark can also be used as a packet sniffing tool if you are in a public network. Wireshark will have access to the entire network connected to a router.
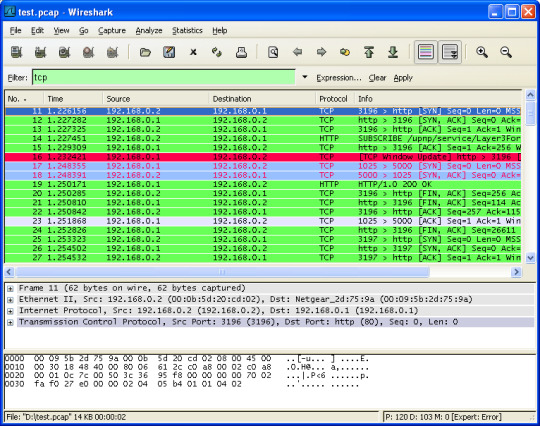
Wireshark UI
Sites like Facebook and Twitter are encrypted now, thanks to HTTPS. This means that even though you can capture packets from a victim computer in transit to Facebook, those packets will be encrypted.
Still, being able to capture data packets in realtime is an important utility for a penetration tester.
Nmap

Nmap is the first tool you will come across when you begin your career as a penetration tester. It is a fantastic network scanning tool that can give you detailed information about a target. This includes open ports, services, and the operating system running on the victim’s computer.
Nmap is popular among penetration testers for many reasons. It is simple, flexible, and extensible. It offers a simple command-line interface where you can add a few flags to choose different types of scans.
Nmap also offers simple ping scans all the way up to aggressive scans that provide detailed ports and service information.
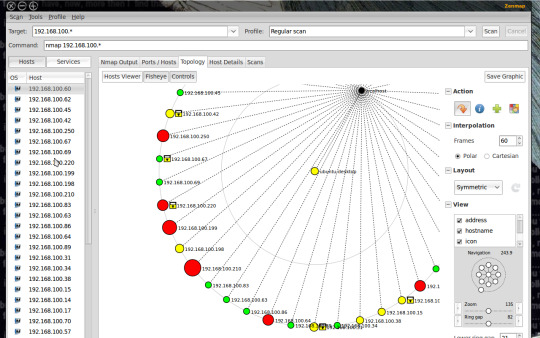
Zenmap UI
Nmap also provides a GUI tool called Zenmap with added utilities. You can build visual network maps and choose scans via dropdowns. Zenmap is a great place to start playing with Nmap commands if you are a beginner.
I recently wrote a detailed article on Nmap that you can read here.
Ncat (Previously Netcat)

Netcat is often referred to as the swiss-army knife in networking.
Netcat is a simple but powerful tool that can view and record data on a TCP or UDP network connections. Netcat functions as a back-end listener that allows for port scanning and port listening.
You can also transfer files through Netcat or use it as a backdoor to your victim machine. This makes is a popular post-exploitation tool to establish connections after successful attacks. Netcat is also extensible given its capability to add scripting for larger or redundant tasks.
In spite of the popularity of Netcat, it was not maintained actively by its community. The Nmap team built an updated version of Netcat called Ncat with features including support for SSL, IPv6, SOCKS, and HTTP proxies.
Metasploit

If there is one tool I love, its Metasploit. Metasploit is not just a tool, but a complete framework that you can use during an entire penetration testing lifecycle.
Metasploit contains exploits for most of the vulnerabilities in the Common Vulnerabilities and Exposure database. Using metasploit, you can send payloads to a target system and gain access to it though a command line interface.
Metasploit is very advanced with the ability to do tasks such as port scanning, enumeration, and scripting in addition to exploitation. You can also build and test your own exploit using the Ruby programming language.
Metasploit was open-source until 2009 after which Rapid7 acquired the product. You can still access free community edition and use all its features.

Armitage UI
Metasploit used to be a purely command-line tool. A Java-based GUI called Armitage was released in 2013.
Nikto

Nikto is an open-source tool that is capable of performing extensive web server scans. Nikto can help you scan for harmful files, misconfigurations, outdated software installations, and so on.
It also checks for the presence of multiple index files, HTTP server configurations, and the installed web server software.
Nikto is the preferred tool for general web server security audits. Nikto is fast, but not quiet. You can scan a large web server pretty quickly but intrusion detection systems will easily pick up these scans. However, there is support for anti-IDS plugins in case you want to perform stealthy scans.
Burp Suite

When it comes to pen-testing web applications, Burpsuite has all the answers for you. BurpSuite aims to be an all in one set of tools for a variety of web application pen-testing use cases. It is also a popular tool among professional web app security researchers and bug bounty hunters.
Burpsuite’s tools work together to support the entire web application testing lifecycle. From scanning to exploitation, Burpsuite offers all the tools you need for breaking into web applications.
One of Burp Suite’s main features is its ability to intercept HTTP requests. HTTP requests usually go from your browser to a web server and then the web server sends a response back. With Burp Suite, you can perform Man-in-the-middle operations to manipulate the request and response.
Burpusite has an excellent user interface. Burpsuite also has tools for automation to make your work faster and more efficient.
In addition to its default features, Burpsuite is extensible by adding plugins called BApps.
John the Ripper

Passwords are still the de-facto standard of authentication in most systems. Even if you successfully get into a server or a database you will have to decrypt the password to gain privilege escalation.
John the Ripper is a simple tool used for cracking passwords. It is a super-fast password cracker with support for custom wordlists. It can run against most types of encryption methods like MD5 and SHA.
Aircrack-ng

Aircrack-ng is a set of tools that help you to work with wireless networks. Aircrack comprises of tools that can capture wireless networks, crack WPA keys, inject packets, and so on.
A few tools in the Aircrack-ng suite include:
airodump — Captures packets
aireplay — Packet injection
aircrack — Crack WEP and WPA
airdecap — Decrypt WEP and WPA
Aircrack contains excellent algorithms for cracking WiFi passwords and to capture wireless traffic. It can also decrypt encrypted packets, making it a complete suite of tools for wireless penetration testing.
In short, you can use Aircrack for monitoring, attacking, and debugging all types of wireless networks.
Nessus

Nessus is a popular enterprise vulnerability scanner. Nessus is built to be a complete vulnerability analysis and reporting tool. While you can scan and find ports or services using Nmap, Nessus will tell you the list of vulnerabilities and how they can be exploited.
Nessus has an excellent user interface, tens of thousands of plugins, and supports embedded scripting. It is often favored by enterprises since it helps companies audit for various compliances like PCI and HIPPA. Nessus will also tell you the severity of the vulnerabilities so that you can focus on those threats accordingly.
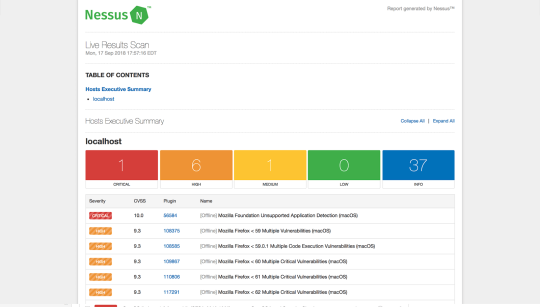
Nessus UI
Nessus is not a free software, but offers a limited free home edition. Nessus has an open-source alternative called Open-Vas that offers similar features.
Snort

Snort is an open-source software for detecting and preventing intrusions in a network. It can perform live traffic analysis and log incoming packets to detect port scans, worms, and other suspicious behavior.
Snort is used for defense compared to most of the other tools in this list. However, snort helps you understand the attacker’s methods by logging their activity. You can also build DNS sinkholes to redirect attacker traffic while finding attack vectors through Snort.
Snort also has a web-based GUI called BASE (Basic Analysis and Security Engine). BASE provides a web front-end to query and analyze the alerts coming from Snort.
Conclusion
In today’s networked world, everyone from government agencies to banks stores critical information in the cloud. Cyber-attacks even have the potential to cripple an entire nation. Hence, protecting these networks is not a choice, but an absolute necessity.
Whether you are a beginner or an experienced cybersecurity engineer, you will find these ten tools invaluable. Good luck on your journey to becoming a successful penetration tester. Learn more tools from the Security Tools Directory.
0 notes
Photo

Macで HTTP Proxy 経由のSSH http://bit.ly/2GbgDpo
macOS からWindows を経由して SSH する機会があったため、調査した内容を残しておきます。 Web上で色々情報が見つかったのですが、現在では古い情報も混ざっているため自分用に整理した内容です。

要件
結果 — Linuxでのncコマンド — Macでのncコマンド
調査 — HTTP Proxy 経由のSSH — netcat(nc)色々 —– Ncat(Nmap付属) —– Open BSD netcat —– Amazon Linux の例 —– Ubuntu の例 —– Netcat Darwin Port —– GNU netcat
要件
macOS -> win_proxy(Windows) -> web(Linux)
上記のように直接接続が許可されていない、win_proxy(WindowsのProxyサーバ)の背後のweb(Linuxサーバ)に対し、 macOSからSSH接続を行います。
HTTP tunnel – Wikipedia
HTTP CONNECT メソッドで接続を確立しトンネルすることで SSH での接続が可能になります。 環境は以下の通りです。
接続元
macOS Sierra version 10.12.6
Proxy
Windows Server 2016
Squid for Windows 3.5.28
結果
Nmap付属のncatを使用すると最も環境に依存せずに実現可能と思います。
Download the Free Nmap Security Scanner for Linux/Mac/Windows --proxy-type オプションで “http” を指定します。
Specify proxy type (“http” or “socks4” or “socks5”)
$ ssh -o ProxyCommand='ncat --proxy-type http --proxy win_proxy:3128 %h %p' -i ~/.ssh/id_rsa ubuntu@web # ssh config Host web Hostname web User ubuntu IdentityFile ~/.ssh/id_rsa ProxyCommand ncat --proxy-type http --proxy win_proxy:3128 %h %p ServerAliveInterval 10
Linuxでのncコマンド
-X オプションで “connect” を指定します。
Supported protocols are “4” (SOCKS v.4), “5” (SOCKS v.5) and “connect” (HTTPS proxy). If the protocol is not specified, SOCKS version 5 is used.
ssh ProxyCommand='nc -X connect -x win_proxy:3128 %h %p' -i ~/.ssh/id_rsa ubuntu@web # ssh config Host web Hostname web User ubuntu IdentityFile ~/.ssh/id_rsa ProxyCommand nc -X connect -x win_proxy:3128 %h %p ServerAliveInterval 10
Macでのncコマンド
macOS 標準搭載のncコマンドでは接続エラーを解消できずでした。
nc: Proxy error: "HTTP/1.1 200 Connection established" ssh_exchange_identification: Connection closed by remote host
間にLinux等を挟む事で無理やり繋ぐ事は可能です。
macOS -> bastion_linux -> win_proxy -> web(Linux)
ssh ProxyCommand='ssh bastion_linux nc --proxy-type http --proxy win_proxy:3128 %h %p' -i ~/.ssh/id_rsa ubuntu@web # ssh_config Host bastion_linux Hostname bastion_linux User hoge Host web Hostname web User ubuntu IdentityFile ~/.ssh/id_rsa ProxyCommand ssh bastion_linux nc --proxy-type http --proxy win_proxy:3128 %h %p ServerAliveInterval 10
調査
以下メモレベルですが、上記Nmap付属のncat使用に至った経緯です。 無駄に長いので折り畳みます。
HTTP Proxy 経由のSSH
OpenSSH で利用するには以下のいずれかが必要になります。
connect コマンド (connect.c)
要コンパイル
公式? connect / wiki / Home — Bitbucket
netcat(nc) コマンド
Macは標準導入されている。派生コマンドが多数(後述)
-W オプション
OpenSSH 5.4 以降 で利用可能な模様
connect-proxy
Debian/Ubuntu であれば apt で導入可能な模様
Redhat系は RPMForge から connect を入れる事例が多い(しかし、既に RPMForge/RepoForge は無い物と考えた方が良い)
netcat(nc)色々
nc コマンドは色々な派生バージョンがあり、どれを指しているのかは環境・オプションにより異なっているようです。
派生・互換ツール(Wiki引用)
Netcat – Wikipedia
- Ncat(Nmap付属) - Nmapの一部として開発された。GPLライセンス。 - OpenBSD netcat - 0から書き直されたnetcat互換ツールでIPv6に対応しているnetcat。BSDライセンス。 - GNU netcat - 0から書き直されたnetcat互換ツール。GPLライセンス。 - Netcat Darwin Port - Mac OS Xで使用可能なnetcatである。 - Windows版netcat - Windows上で使用可能なnetcatである。 - Jetcat - netcatの一部の機能をJavaで実現したものである。
Ncat(Nmap付属)
環境依存が最も少ないのではないかと思われる物です。
公式 Nmap: the Network Mapper – Free Security Scanner
Mac OS X 用のバイナリもあります。 今回使用した端末は諸事情によりソフトウェアのインストールが行えなかったため実際には未確認です。 Linux上での接続は確認できました。オプション等は同じようなので、同様に接続可能と思われます。 proxy-type オプションに http 指定して接続します。
Proxying | Ncat Users’ Guide
# インストール $ sudo rpm -vhU https://nmap.org/dist/ncat-7.70-1.x86_64.rpm Retrieving https://nmap.org/dist/ncat-7.70-1.x86_64.rpm Preparing... ################################# [100%] Updating / installing... 1:ncat-2:7.70-1 ################################# [100%] $ which ncat /usr/bin/ncat
# ヘルプ $ ncat --help Ncat 7.70 ( https://nmap.org/ncat ) Usage: ncat [options] [hostname] [port] Options taking a time assume seconds. Append 'ms' for milliseconds, 's' for seconds, 'm' for minutes, or 'h' for hours (e.g. 500ms). -4 Use IPv4 only -6 Use IPv6 only -U, --unixsock Use Unix domain sockets only -C, --crlf Use CRLF for EOL sequence -c, --sh-exec <command> Executes the given command via /bin/sh -e, --exec <command> Executes the given command --lua-exec <filename> Executes the given Lua script -g hop1[,hop2,...] Loose source routing hop points (8 max) -G <n> Loose source routing hop pointer (4, 8, 12, ...) -m, --max-conns <n> Maximum <n> simultaneous connections -h, --help Display this help screen -d, --delay <time> Wait between read/writes -o, --output <filename> Dump session data to a file -x, --hex-dump <filename> Dump session data as hex to a file -i, --idle-timeout <time> Idle read/write timeout -p, --source-port port Specify source port to use -s, --source addr Specify source address to use (doesn't affect -l) -l, --listen Bind and listen for incoming connections -k, --keep-open Accept multiple connections in listen mode -n, --nodns Do not resolve hostnames via DNS -t, --telnet Answer Telnet negotiations -u, --udp Use UDP instead of default TCP --sctp Use SCTP instead of default TCP -v, --verbose Set verbosity level (can be used several times) -w, --wait <time> Connect timeout -z Zero-I/O mode, report connection status only --append-output Append rather than clobber specified output files --send-only Only send data, ignoring received; quit on EOF --recv-only Only receive data, never send anything --allow Allow only given hosts to connect to Ncat --allowfile A file of hosts allowed to connect to Ncat --deny Deny given hosts from connecting to Ncat --denyfile A file of hosts denied from connecting to Ncat --broker Enable Ncat's connection brokering mode --chat Start a simple Ncat chat server --proxy <addr[:port]> Specify address of host to proxy through --proxy-type <type> Specify proxy type ("http" or "socks4" or "socks5") --proxy-auth <auth> Authenticate with HTTP or SOCKS proxy server --ssl Connect or listen with SSL --ssl-cert Specify SSL certificate file (PEM) for listening --ssl-key Specify SSL private key (PEM) for listening --ssl-verify Verify trust and domain name of certificates --ssl-trustfile PEM file containing trusted SSL certificates --ssl-ciphers Cipherlist containing SSL ciphers to use --ssl-alpn ALPN protocol list to use. --version Display Ncat's version information and exit See the ncat(1) manpage for full options, descriptions and usage examples
OpenBSD netcat
Linux に標準導入されているコマンドを指している物と思われます。
Amazon Linux の例
Amazon Linux AMI 2018.03
$ yum list installed nc nc.x86_64 1.84-24.8.amzn1 installed [ec2-user@ip-172-30-2-241 ~]$ $ which nc /usr/bin/nc
# help 抜粋 $ nc -h usage: nc [-46DdhklnrStUuvzC] [-i interval] [-p source_port] [-s source_ip_address] [-T ToS] [-w timeout] [-X proxy_version] [-x proxy_address[:port]] [hostname] [port[s]] # man 抜粋 NC(1) BSD General Commands Manual NC(1) NAME nc — arbitrary TCP and UDP connections and listens SYNOPSIS nc [-46DdhklnrStUuvzC] [-i interval] [-p source_port] [-s source_ip_address] [-T ToS] [-w timeout] [-X proxy_protocol] [-x proxy_address[:port]] [hostname] [port[s]] DESCRIPTION The nc (or netcat) utility is used for just about anything under the sun involving TCP or UDP. It can open TCP connections, send UDP packets, listen on arbitrary TCP and UDP ports, do port scanning, and deal with both IPv4 and IPv6. Unlike telnet(1), nc scripts nicely, and separates error messages onto standard error instead of sending them to standard output, as telnet(1) does with some. ・・・ SEE ALSO cat(1), ssh(1) AUTHORS Original implementation by *Hobbit* ⟨[email protected]⟩. Rewritten with IPv6 support by Eric Jackson <[email protected]>. CAVEATS UDP port scans will always succeed (i.e. report the port as open), rendering the -uz combination of flags relatively useless. BSD August 22, 2006 BSD
Ubuntu の例
Ubuntu 16.04.5 LTS
$ dpkg -l | grep netcat ii netcat-openbsd 1.105-7ubuntu1 amd64 TCP/IP swiss army knife $ which nc /bin/nc $ ls -l /bin/nc lrwxrwxrwx 1 root root 20 Sep 12 13:39 /bin/nc -> /etc/alternatives/nc $ ls -l /etc/alternatives/nc lrwxrwxrwx 1 root root 15 Sep 12 13:39 /etc/alternatives/nc -> /bin/nc.openbsd $ ls -l /bin/nc.openbsd -rwxr-xr-x 1 root root 31248 Dec 4 2012 /bin/nc.openbsd
# help $ nc This is nc from the netcat-openbsd package. An alternative nc is available in the netcat-traditional package. usage: nc [-46bCDdhjklnrStUuvZz] [-I length] [-i interval] [-O length] [-P proxy_username] [-p source_port] [-q seconds] [-s source] [-T toskeyword] [-V rtable] [-w timeout] [-X proxy_protocol] [-x proxy_address[:port]] [destination] [port] # man(抜粋) $ man nc |cat NC(1) BSD General Commands Manual NC(1) NAME nc — arbitrary TCP and UDP connections and listens SYNOPSIS nc [-46bCDdhklnrStUuvZz] [-I length] [-i interval] [-O length] [-P proxy_username] [-p source_port] [-q seconds] [-s source] [-T toskeyword] [-V rtable] [-w timeout] [-X proxy_protocol] [-x proxy_address[:port]] [destination] [port] DESCRIPTION The nc (or netcat) utility is used for just about anything under the sun involving TCP, UDP, or UNIX-domain sockets. It can open TCP connec‐ tions, send UDP packets, listen on arbitrary TCP and UDP ports, do port scanning, and deal with both IPv4 and IPv6. Unlike telnet(1), nc scripts nicely, and separates error messages onto standard error instead of sending them to standard output, as telnet(1) does with some. ・・・ SEE ALSO cat(1), ssh(1) AUTHORS Original implementation by *Hobbit* ⟨[email protected]⟩. Rewritten with IPv6 support by Eric Jackson <[email protected]>. Modified for Debian port by Aron Xu ⟨[email protected]⟩. CAVEATS UDP port scans using the -uz combination of flags will always report success irrespective of the target machine's state. However, in con‐ junction with a traffic sniffer either on the target machine or an intermediary device, the -uz combination could be useful for communica‐ tions diagnostics. Note that the amount of UDP traffic generated may be limited either due to hardware resources and/or configuration settings. BSD February 7, 2012 BSD
Netcat Darwin Port
Macで標準導入されているncコマンドを指すと思われます。
$ which nc /usr/bin/nc
# help(stringsからの)抜粋 ・・・ This help text %s%s -i secs Delay interval for lines sent, ports scanned Keep inbound sockets open for multiple connects Listen mode, for inbound connects %s%s Suppress name/port resolutions %s%s%s -p port Specify local port for remote connects (cannot use with -l) Randomize remote ports -s addr Local source address Answer TELNET negotiation Use UNIX domain socket UDP mode Verbose -w secs Timeout for connects and final net reads -X proto Proxy protocol: "4", "5" (SOCKS) or "connect" -x addr[:port] Specify proxy address and port Zero-I/O mode [used for scanning] %s%s Port numbers can be individual or ranges: lo-hi [inclusive] Set SO_RECV_ANYIF on socket Set SO_AWDL_UNRESTRICTED on socket -b ifbound Bind socket to interface Don't use cellular connection Don't use expensive interfaces Do not use flow advisory (flow adv enabled by default) -G conntimo Connection timeout in seconds -H keepidle Initial idle timeout in seconds -I keepintvl Interval for repeating idle timeouts in seconds -J keepcnt Number of times to repeat idle timeout -K tclass Specify traffic class -L num_probes Number of probes to send before generating a read timeout event Set SO_INTCOPROC_ALLOW on socket Use MULTIPATH domain socket -N num_probes Number of probes to send before generating a write timeout event Use old-style connect instead of connectx Issue socket options after connect/bind --apple-delegate-pid pid Set socket as delegate using pid --apple-delegate-uuid uuid Set socket as delegate using uuid --apple-ext-bk-idle Extended background idle time --apple-ecn Set the ECN mode --apple-sockev Receive and print socket events --apple-notify-ack Receive events when data gets acknowledged --apple-tos Set the IP_TOS or IPV6_TCLASS option --apple-netsvctype Set the network service type usage: nc [-46AacCDdEFhklMnOortUuvz] [-K tc] [-b boundif] [-i interval] [-p source_port] [--apple-delegate-pid pid] [--apple-delegate-uuid uuid] [-s source_ip_address] [-w timeout] [-X proxy_version] [-x proxy_address[:port]] [hostname] [port[s]] ・・・ @(#)PROGRAM:nc PROJECT:netcat-41
今回、この標準コマンドで繋ぐことができれば話が早かったのですが、 弊端末からは接続できない(以下エラーが解消できない)状態でした。 同様のNW構成としたLinux端末からは接続可能、また、接続可能な事例もいくつか見られましたので、環境・バージョンの問題かと思われます。
nc: Proxy error: "HTTP/1.1 200 Connection established" ssh_exchange_identification: Connection closed by remote host
参考URL
Connect with SSH through a proxy – Stack Overflow
OS X では SOCKS5 でしか繋げないような回答
Squid – Users – squid upgrade issue and tunnelled ssh connections
Squid 3.4.2 にアップデート後、ssh接続が利用不可となった事例
GNU netcat
brew でインストール可能です。 proxy_version のオプションが無く、http_proxyの指定ができないようでした。
$ brew install netcat $ brew list netcat /usr/local/Cellar/netcat/0.7.1/bin/nc /usr/local/Cellar/netcat/0.7.1/bin/netcat /usr/local/Cellar/netcat/0.7.1/share/info/netcat.info /usr/local/Cellar/netcat/0.7.1/share/man/ (2 files) $ which netcat /usr/local/bin/netcat $ ls /usr/local/Cellar/netcat/0.7.1/bin/ nc@ netcat*
# help $ netcat --help GNU netcat 0.7.1, a rewrite of the famous networking tool. Basic usages: connect to somewhere: netcat [options] hostname port [port] ... listen for inbound: netcat -l -p port [options] [hostname] [port] ... tunnel to somewhere: netcat -L hostname:port -p port [options] Mandatory arguments to long options are mandatory for short options too. Options: -c, --close close connection on EOF from stdin -e, --exec=PROGRAM program to exec after connect -g, --gateway=LIST source-routing hop point[s], up to 8 -G, --pointer=NUM source-routing pointer: 4, 8, 12, ... -h, --help display this help and exit -i, --interval=SECS delay interval for lines sent, ports scanned -l, --listen listen mode, for inbound connects -L, --tunnel=ADDRESS:PORT forward local port to remote address -n, --dont-resolve numeric-only IP addresses, no DNS -o, --output=FILE output hexdump traffic to FILE (implies -x) -p, --local-port=NUM local port number -r, --randomize randomize local and remote ports -s, --source=ADDRESS local source address (ip or hostname) -t, --tcp TCP mode (default) -T, --telnet answer using TELNET negotiation -u, --udp UDP mode -v, --verbose verbose (use twice to be more verbose) -V, --version output version information and exit -x, --hexdump hexdump incoming and outgoing traffic -w, --wait=SECS timeout for connects and final net reads -z, --zero zero-I/O mode (used for scanning) Remote port number can also be specified as range. Example: '1-1024'
元記事はこちら
「Macで HTTP Proxy 経由のSSH」
January 30, 2019 at 12:00PM
0 notes